本文主要介绍使用AppBarLayout+RecyclerView滑动吸顶布局,其滑动原理,以及如何禁止滑动,包括禁止滑动AppBarLayout本身滑动,以及禁止滑动RecyclerView而让AppBarLayout滑动的操作。
先上图
嵌套滑动原理 要达到如上效果,我们首先要知道其滑动原理,其主要还是使用了NestedScrolling的原理,CoordinatorLayout和AppBarLayout以及RecyclerView都实现了NestedScrolling的接口。主要是NestedScrollingChildHelper类和NestedScrollingParent2接口配合实现。还有NestedScrollingParent3只是在更高版本上的一些优化,此次不展开,有兴趣可以自行了解。
NestedScrollingChildHelper:子view的嵌套滑动代理类,实现对其父View的嵌套滑动操作。
NestedScrollingParent2:父view实现此接口,响应子view的嵌套滑动操作。
所以如果把RecyclerView换成ListView就无法达到滑动滑动吸顶的效果。因为ListView并没有实现此接口
我们可以看下NestedScrollingParent2接口:
1 2 3 4 5 6 7 8 9 10 11 12 13 14 15 16 17 18 19 20 21 22 23 24 25 26 27 28 29 30 31 32 33 34 35 36 37 38 public interface NestedScrollingParent2 extends NestedScrollingParent boolean onStartNestedScroll (@NonNull View child, @NonNull View target, @ScrollAxis int axes, @NestedScrollType int type) void onNestedScrollAccepted (@NonNull View child, @NonNull View target, @ScrollAxis int axes, @NestedScrollType int type) void onStopNestedScroll (@NonNull View target, @NestedScrollType int type) void onNestedScroll (@NonNull View target, int dxConsumed, int dyConsumed, int dxUnconsumed, int dyUnconsumed, @NestedScrollType int type) void onNestedPreScroll (@NonNull View target, int dx, int dy, @NonNull int [] consumed, @NestedScrollType int type) }
RecyclerView嵌套滑动实现 RecyclerView的滑动实现主要在于其onTouchEvent方法:
1
2
3
4
5
6
7
8
9
10
11
12
13
14
15
16
17
18
19
20
21
22
23
24
25
26
27
28
29
30
31
32
33
34
35
36
37
38
39
40
41
42
43
44
45
46
47
48
49
50
51
52
53
54
55
56
57
58
59
60
61
62
63
64
65
66
67
68
69
70
71
72
73
74
75
@Override public boolean onTouchEvent (MotionEvent e) switch (action) { case MotionEvent.ACTION_DOWN: { mScrollPointerId = e.getPointerId(0 ); mInitialTouchX = mLastTouchX = (int ) (e.getX() + 0.5f ); mInitialTouchY = mLastTouchY = (int ) (e.getY() + 0.5f ); int nestedScrollAxis = ViewCompat.SCROLL_AXIS_NONE; if (canScrollHorizontally) { nestedScrollAxis |= ViewCompat.SCROLL_AXIS_HORIZONTAL; } if (canScrollVertically) { nestedScrollAxis |= ViewCompat.SCROLL_AXIS_VERTICAL; } startNestedScroll(nestedScrollAxis, TYPE_TOUCH); } break ; case MotionEvent.ACTION_POINTER_DOWN: { mScrollPointerId = e.getPointerId(actionIndex); mInitialTouchX = mLastTouchX = (int ) (e.getX(actionIndex) + 0.5f ); mInitialTouchY = mLastTouchY = (int ) (e.getY(actionIndex) + 0.5f ); } break ; case MotionEvent.ACTION_MOVE: { if (mScrollState == SCROLL_STATE_DRAGGING) { mReusableIntPair[0 ] = 0 ; mReusableIntPair[1 ] = 0 ; if (dispatchNestedPreScroll( canScrollHorizontally ? dx : 0 , canScrollVertically ? dy : 0 , mReusableIntPair, mScrollOffset, TYPE_TOUCH )) { dx -= mReusableIntPair[0 ]; dy -= mReusableIntPair[1 ]; mNestedOffsets[0 ] += mScrollOffset[0 ]; mNestedOffsets[1 ] += mScrollOffset[1 ]; getParent().requestDisallowInterceptTouchEvent(true ); } mLastTouchX = x - mScrollOffset[0 ]; mLastTouchY = y - mScrollOffset[1 ]; if (scrollByInternal( canScrollHorizontally ? dx : 0 , canScrollVertically ? dy : 0 , e)) { getParent().requestDisallowInterceptTouchEvent(true ); } if (mGapWorker != null && (dx != 0 || dy != 0 )) { mGapWorker.postFromTraversal(this , dx, dy); } } } break ; } }
首先看第一步startNestedScroll的实现:
1
2
3
4
5
@Override public boolean startNestedScroll (int axes) return getScrollingChildHelper().startNestedScroll(axes); }
其就是NestedScrollingChildHelper这个代理真正来实现的:
1
2
3
4
5
6
7
8
9
10
11
12
13
14
15
16
17
18
19
20
21
22
23
24
25
26
27
28
public boolean startNestedScroll (@ScrollAxis int axes, @NestedScrollType int type) if (hasNestedScrollingParent(type)) { return true ; } if (isNestedScrollingEnabled()) { ViewParent p = mView.getParent(); View child = mView; while (p != null ) { if (ViewParentCompat.onStartNestedScroll(p, child, mView, axes, type)) { setNestedScrollingParentForType(type, p); ViewParentCompat.onNestedScrollAccepted(p, child, mView, axes, type); return true ; } if (p instanceof View) { child = (View) p; } p = p.getParent(); } } return false ; }
从上面的代码注释已经能看出了,两种禁止嵌套滑动的方式。
 1. 通过RecyclerView.setNestedScrollingEnabled方法
 2. 通过重写父View的onStartNestedScroll方法让其返回false
1
2
3
4
5
6
7
8
9
10
11
12
13
14
15
16
17
18
19
20
21
22
23
24
25
26
27
28
29
30
31
32
33
34
35
36
37
38
39
40
41
public boolean dispatchNestedPreScroll (int dx, int dy, @Nullable int [] consumed, @Nullable int [] offsetInWindow, @NestedScrollType int type) if (isNestedScrollingEnabled()) { final ViewParent parent = getNestedScrollingParentForType(type); if (parent == null ) { return false ; } if (dx != 0 || dy != 0 ) { int startX = 0 ; int startY = 0 ; if (offsetInWindow != null ) { mView.getLocationInWindow(offsetInWindow); startX = offsetInWindow[0 ]; startY = offsetInWindow[1 ]; } if (consumed == null ) { consumed = getTempNestedScrollConsumed(); } consumed[0 ] = 0 ; consumed[1 ] = 0 ; ViewParentCompat.onNestedPreScroll(parent, mView, dx, dy, consumed, type); if (offsetInWindow != null ) { mView.getLocationInWindow(offsetInWindow); offsetInWindow[0 ] -= startX; offsetInWindow[1 ] -= startY; } return consumed[0 ] != 0 || consumed[1 ] != 0 ; } else if (offsetInWindow != null ) { offsetInWindow[0 ] = 0 ; offsetInWindow[1 ] = 0 ; } } return false ; }
代码中关键步骤注释都写的很清楚了。
这个方法其实就一个用处: 调用父view的onNestedPreScroll接口通过传入的数组来得到父view消费了多少滑动距离。
再接下来看下第三步其内部滑动scrollByInternal :
1
2
3
4
5
6
7
8
9
10
11
12
13
14
15
16
17
18
19
20
21
22
23
24
25
26
27
28
29
30
31
32
33
34
35
36
37
38
39
40
41
42
43
44
45
46
47
48
49
50
51
52
53
54
boolean scrollByInternal (int x, int y, MotionEvent ev) int unconsumedX = 0 ; int unconsumedY = 0 ; int consumedX = 0 ; int consumedY = 0 ; consumePendingUpdateOperations(); if (mAdapter != null ) { mReusableIntPair[0 ] = 0 ; mReusableIntPair[1 ] = 0 ; scrollStep(x, y, mReusableIntPair); consumedX = mReusableIntPair[0 ]; consumedY = mReusableIntPair[1 ]; unconsumedX = x - consumedX; unconsumedY = y - consumedY; } if (!mItemDecorations.isEmpty()) { invalidate(); } mReusableIntPair[0 ] = 0 ; mReusableIntPair[1 ] = 0 ; dispatchNestedScroll(consumedX, consumedY, unconsumedX, unconsumedY, mScrollOffset, TYPE_TOUCH, mReusableIntPair); unconsumedX -= mReusableIntPair[0 ]; unconsumedY -= mReusableIntPair[1 ]; boolean consumedNestedScroll = mReusableIntPair[0 ] != 0 || mReusableIntPair[1 ] != 0 ; mLastTouchX -= mScrollOffset[0 ]; mLastTouchY -= mScrollOffset[1 ]; mNestedOffsets[0 ] += mScrollOffset[0 ]; mNestedOffsets[1 ] += mScrollOffset[1 ]; if (getOverScrollMode() != View.OVER_SCROLL_NEVER) { if (ev != null && !MotionEventCompat.isFromSource(ev, InputDevice.SOURCE_MOUSE)) { pullGlows(ev.getX(), unconsumedX, ev.getY(), unconsumedY); } considerReleasingGlowsOnScroll(x, y); } if (consumedX != 0 || consumedY != 0 ) { dispatchOnScrolled(consumedX, consumedY); } if (!awakenScrollBars()) { invalidate(); } return consumedNestedScroll || consumedX != 0 || consumedY != 0 ; }
可以看上面代码注释,此方法主要作用作用:
1. 先滑动`RecyclerView`本身。
 2. 然后把剩余的未消费滑动距离再分发给到父view进行滑动。
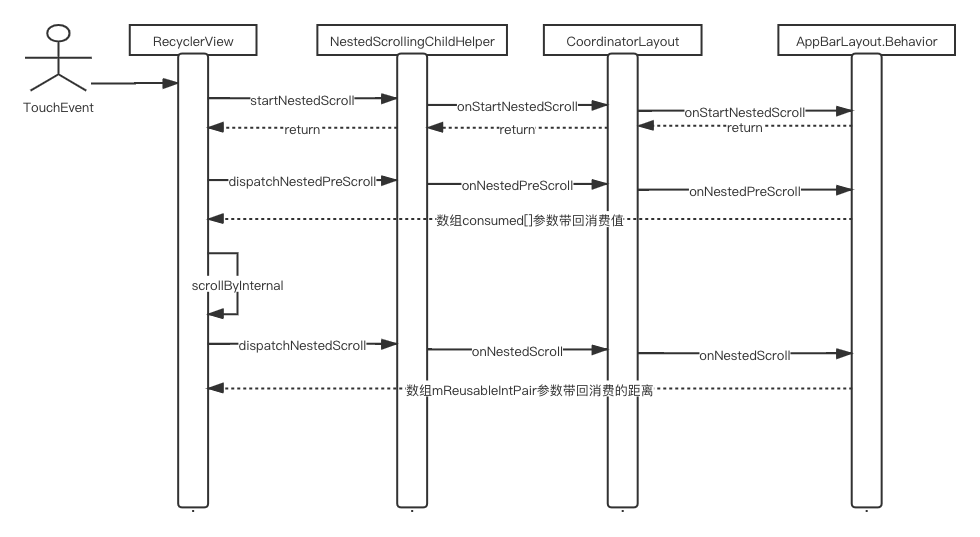
子RecyclerView嵌套滑动总结 从上面可以看到嵌套滑动的子View的整体嵌套滑动步骤分为三大步:
第一步: startNestedScroll
开启本轮嵌套滑动,调用父view实现的NestedScrollingParent2.onStartNestedScroll接口
第二步: dispatchNestedPreScroll
分发嵌套预滑动,把滑动距离预先分发给父view,父view自己处理决定是否消费。
这里主要是调用了父类实现的``NestedScrollingParent2.onNestedPreScroll` 接口
所以滑动RecyclerView的时候,先响应头还是先响应本身正是基于此方法实现的。
第三步: scrollByInternal
RecyclerView自己内部滑动未被父view消费的距离。
自身滑动后,再把还剩下的未消费的距离再次分发给到父布局。父布局可以再次进行消费。
这里主要调用父类实现的 NestedScrollingParent2.onNestedScroll
到此嵌套滑动NestedScrollingParent2的滑动接口以及全部用到了。
父CoordinatorLayout嵌套滑动实现 上面以及完整讲过子RecyclerView嵌套滑动的整个步骤,其最终都会调用到父view的嵌套滑动接口。接下来在按照其先后顺序看下父view的嵌套滑动的接口实现。
首先来看下onStartNestedScroll的实现
1
2
3
4
5
6
7
8
9
10
11
12
13
14
15
16
17
18
19
20
21
22
23
24
25
26
27
28
29
30
31
@Override @SuppressWarnings("unchecked") public boolean onStartNestedScroll (View child, View target, int axes, int type) boolean handled = false ; final int childCount = getChildCount(); for (int i = 0 ; i < childCount; i++) { final View view = getChildAt(i); if (view.getVisibility() == View.GONE) { continue ; } final LayoutParams lp = (LayoutParams) view.getLayoutParams(); final Behavior viewBehavior = lp.getBehavior(); if (viewBehavior != null ) { final boolean accepted = viewBehavior.onStartNestedScroll(this , view, child, target, axes, type); handled |= accepted; lp.setNestedScrollAccepted(type, accepted); } else { lp.setNestedScrollAccepted(type, false ); } } return handled; }
从上又有一种禁止嵌套滑动的的方法
1 . 自定义AppBarLayout的Behavior,使onStartNestedScroll 返回false,则此子View不会进行嵌套滑动。
接下来再来看onNestedPreScroll:
1
2
3
4
5
6
7
8
9
10
11
12
13
14
15
16
17
18
19
20
21
22
23
24
25
26
27
28
29
30
31
32
33
34
35
36
37
38
39
40
41
42
43
44
45
46
@Override @SuppressWarnings("unchecked") public void onNestedPreScroll (View target, int dx, int dy, int [] consumed, int type) int xConsumed = 0 ; int yConsumed = 0 ; boolean accepted = false ; final int childCount = getChildCount(); for (int i = 0 ; i < childCount; i++) { final View view = getChildAt(i); if (view.getVisibility() == GONE) { continue ; } final LayoutParams lp = (LayoutParams) view.getLayoutParams(); if (!lp.isNestedScrollAccepted(type)) { continue ; } final Behavior viewBehavior = lp.getBehavior(); if (viewBehavior != null ) { mBehaviorConsumed[0 ] = 0 ; mBehaviorConsumed[1 ] = 0 ; viewBehavior.onNestedPreScroll(this , view, target, dx, dy, mBehaviorConsumed, type); xConsumed = dx > 0 ? Math.max(xConsumed, mBehaviorConsumed[0 ]) : Math.min(xConsumed, mBehaviorConsumed[0 ]); yConsumed = dy > 0 ? Math.max(yConsumed, mBehaviorConsumed[1 ]) : Math.min(yConsumed, mBehaviorConsumed[1 ]); accepted = true ; } } consumed[0 ] = xConsumed; consumed[1 ] = yConsumed; if (accepted) { onChildViewsChanged(EVENT_NESTED_SCROLL); } }
从上述代码可以看出,在父View的onNestedPreScroll中,主要是调用子类的Behavior的onNestedPreScroll方法,由子类的Behavior真正实现如何响应滑动,子View进行滑动后会把自己消费了多少距离,通过数组传回给到了最初的子View也就是RecyclerView
其实对于AppBarLayout如何嵌套滑动完全都可以由我们自己自定义。
再接下来我们看下onNestedScroll
1
2
3
4
5
6
7
8
9
10
11
12
13
14
15
16
17
18
19
20
21
22
23
24
25
26
27
28
29
30
31
32
33
34
35
36
37
38
39
40
41
42
43
44
45
46
47
48
@Override @SuppressWarnings("unchecked") public void onNestedScroll (@NonNull View target, int dxConsumed, int dyConsumed, int dxUnconsumed, int dyUnconsumed, @ViewCompat .NestedScrollType int type, @NonNull int [] consumed) final int childCount = getChildCount(); boolean accepted = false ; int xConsumed = 0 ; int yConsumed = 0 ; for (int i = 0 ; i < childCount; i++) { final View view = getChildAt(i); if (view.getVisibility() == GONE) { continue ; } final LayoutParams lp = (LayoutParams) view.getLayoutParams(); if (!lp.isNestedScrollAccepted(type)) { continue ; } final Behavior viewBehavior = lp.getBehavior(); if (viewBehavior != null ) { mBehaviorConsumed[0 ] = 0 ; mBehaviorConsumed[1 ] = 0 ; viewBehavior.onNestedScroll(this , view, target, dxConsumed, dyConsumed, dxUnconsumed, dyUnconsumed, type, mBehaviorConsumed); xConsumed = dxUnconsumed > 0 ? Math.max(xConsumed, mBehaviorConsumed[0 ]) : Math.min(xConsumed, mBehaviorConsumed[0 ]); yConsumed = dyUnconsumed > 0 ? Math.max(yConsumed, mBehaviorConsumed[1 ]) : Math.min(yConsumed, mBehaviorConsumed[1 ]); accepted = true ; } } consumed[0 ] += xConsumed; consumed[1 ] += yConsumed; if (accepted) { onChildViewsChanged(EVENT_NESTED_SCROLL); } }
从上述代码可以看到onNestedScroll和onNestedPreScroll的处理过程基本一样,本来也都是处理AppBarLayout的滑动,只是处理的时机不一样罢了。
到此整个嵌套滑动的过程以及很清晰了。
下面附上时序图:
总结 以上是以RecyclerView为例,讲述的原理流程,其实也可以替换成任何实现了嵌套滑动接口的View。关于如何禁止滑动其实在过程中已经讲的很清楚了。没有再细讲如何实现吸顶的,其实想想也能就能明白,吸顶其实就是上滑的时候,滑到一定距离就不让AppBarLayout上移了。那其实就是可以通过其本身滑动的Behavior控制其可滑动距离罢了。当然其实AppBarLayout本身已经实现好了,其通过给其子View设置layout_scrollFlags来控制其滑动行为。这个在此不展开了。
本地使用示例代码地址:https://github.com/sunytan/StickerBarDemo/